Square Payment Gateway Integration
Square is a comprehensive payment platform that simplifies accepting payments online, in-person, and via mobile apps. Operating in countries like the USA, Canada, UK, Australia, Japan, Ireland, France, and Spain, Square supports major credit/debit cards (Visa, MasterCard, AmEx, Discover), digital wallets (Apple Pay, Google Pay, Cash App), and ACH payments (US-only). Unlike traditional gateways, Square acts as an end-to-end processor, eliminating the need for a separate merchant account. With features like customizable checkouts, recurring payments, and PCI compliance built-in, Square is ideal for businesses seeking a unified solution across channels.
This guide walks you through integrating Square into your application, from account setup to live deployment.
Step 1: Log in or Sign Up
- Visit Square: Go to Square and click Sign Up to create a merchant account or Log In if you have one.
- Account Creation: Provide your email, password, and business details (e.g., name, country, industry). No separate merchant account is needed—Square handles this.
- Email Verification: Check your inbox for a verification email from Square and click the link to activate your account.
- Dashboard Access: Log in to the Square Dashboard at squareup.com/dashboard. You’ll automatically get Sandbox access for testing.
Step 2: Set Up Your Account
Before processing payments, configure your Square account:
- Complete Your Profile:
- In the Dashboard, go to Account & Settings > Business Information.
- Enter your business details: legal name, address, phone number, and website URL (optional for testing).
- For individuals, provide personal details.
- Business Verification (Required for Live Mode):
- Navigate to Account & Settings > Verification.
- Submit documents like a business license, ID, or tax ID (varies by country, e.g., EIN for US).
- Verification takes 1-2 business days; you’ll be notified via email.
- Add a Bank Account:
- Go to Account & Settings > Bank Accounts.
- Link your bank (e.g., routing/account number for US, IBAN for Europe) for payouts. Square deposits funds in 1-2 business days (or instantly for a 1% fee).
- Verify with a test deposit if prompted.
- Sandbox Mode: Use the Sandbox at developer.squareup.com with test credentials to simulate payments without verification.
Step 3: Obtain API Credentials
Square provides credentials for integration:
- Application ID: Identifies your app (e.g.,
sq0idp-abc123xyz). - Access Token: Authenticates API requests (e.g.,
EAAAE_xyz789abcfor live,sandbox-sq0atb-def456ghifor test). - Location ID: Specifies the business location for transactions (e.g.,
L1234567890).
How to Get Your Credentials:
- Log in to the Square Developer Portal at developer.squareup.com.
- Go to Applications and click Create Application.
- Name your app (e.g., "MyStoreApp") and save:
- Application ID: Displayed immediately.
- Access Token: Generate under Credentials (Sandbox token available instantly; live token post-verification).
- Location ID: Find under Locations after linking a Square account.
- Key Security: Keep the Access Token confidential—use it server-side only. Store all credentials securely.
- Add these to your application’s Admin Panel under System Settings > Payment Gateways > Square.
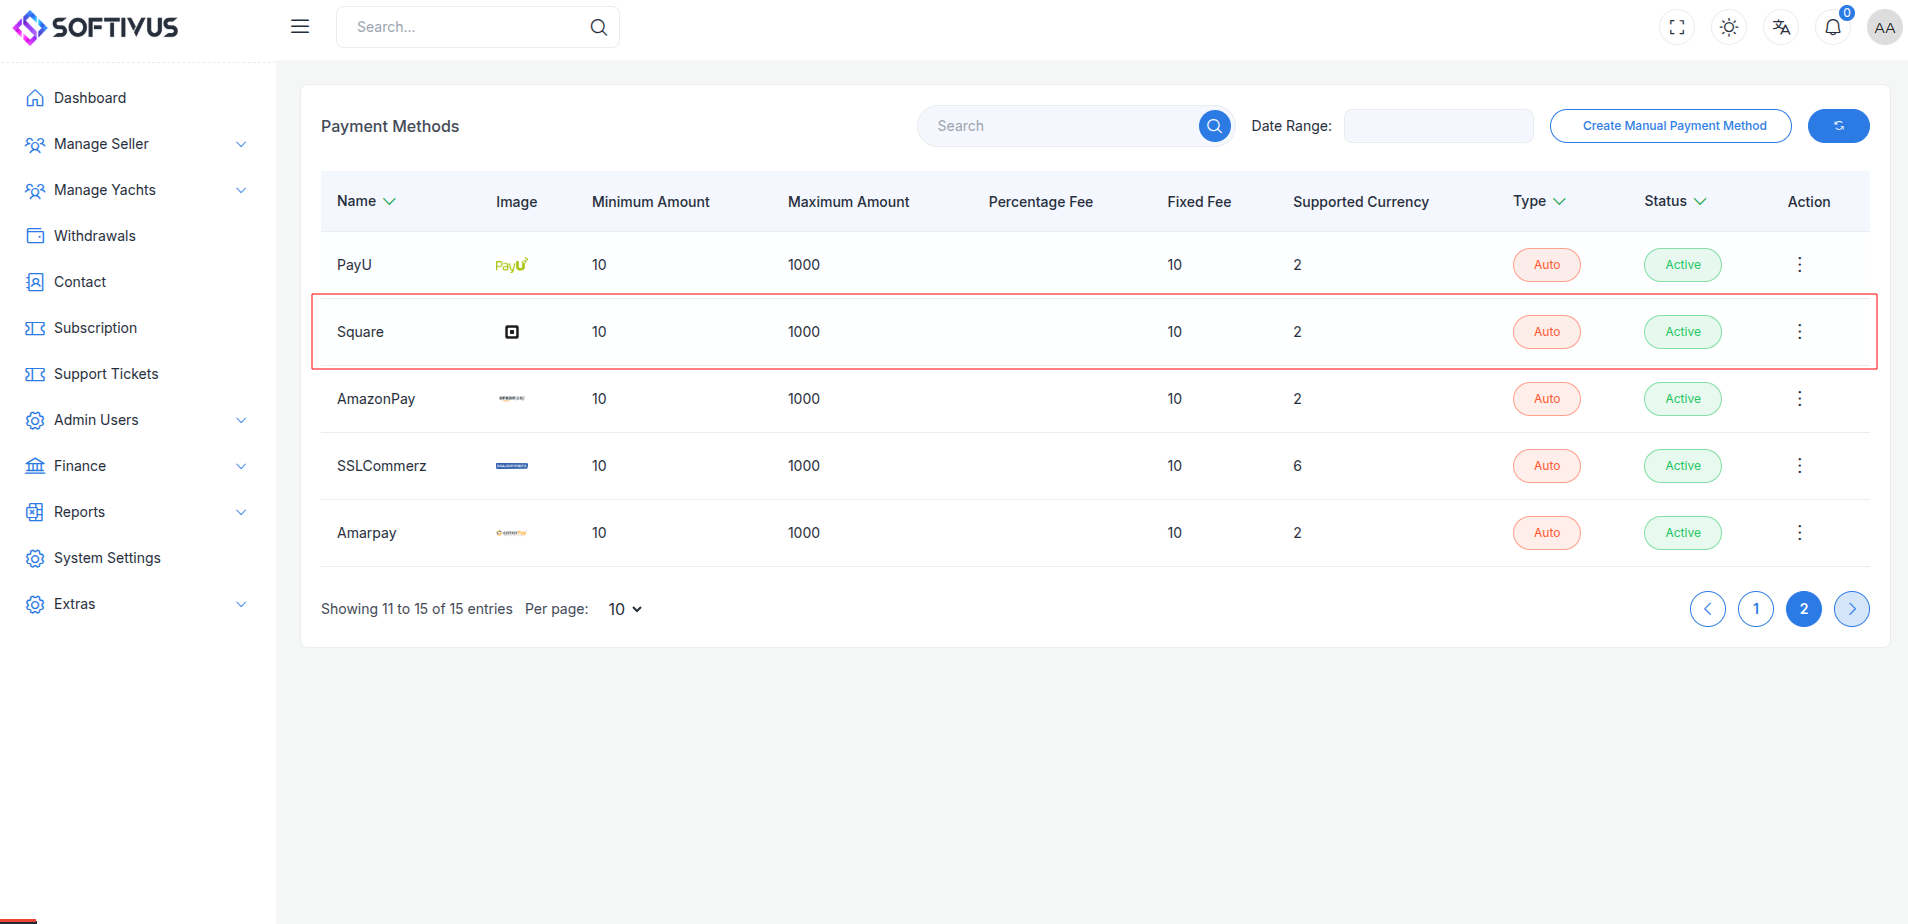
Step 4: Configure Payment Methods
Square supports various payment methods, enabled by default or via settings:
- Go to Account & Settings > Payments in the Dashboard.
- Available methods include:
- Cards: Visa, MasterCard, AmEx, Discover (enabled by default).
- Digital Wallets: Apple Pay, Google Pay, Cash App (enable via API or hardware).
- ACH: US-only bank transfers (enable via Dashboard or API).
- Contact support@squareup.com to enable additional methods (e.g., Afterpay) or multi-currency support.
- These methods will appear in your checkout flow once integrated.
Step 5: Set Up Webhooks
Webhooks notify your server of payment events (e.g., payment success):
- In the Developer Portal, go to Webhooks.
- Click Add Endpoint.
- Webhook URL:
- Enter the URL from your application (e.g.,
https://yourwebsite.com/webhooks/square). - Find this URL in your Admin Panel under Square settings.
- Ensure your endpoint accepts POST requests and returns a 200 OK response.
- Events: Subscribe to events like:
payment.created: Payment initiated.payment.updated: Status changed (e.g., completed, failed).refund.created: Refund processed.
- Save the webhook. Square signs notifications with your Access Token for verification.
- Testing: Use the Sandbox to send test webhooks and confirm receipt.
Step 6: Set Up Credentials in Our Dashboard
Integrate Square into your application:
- Log in to your application’s Admin Panel.
- Navigate to System Settings > Payment Gateways > Square.
- Fill out the configuration form:
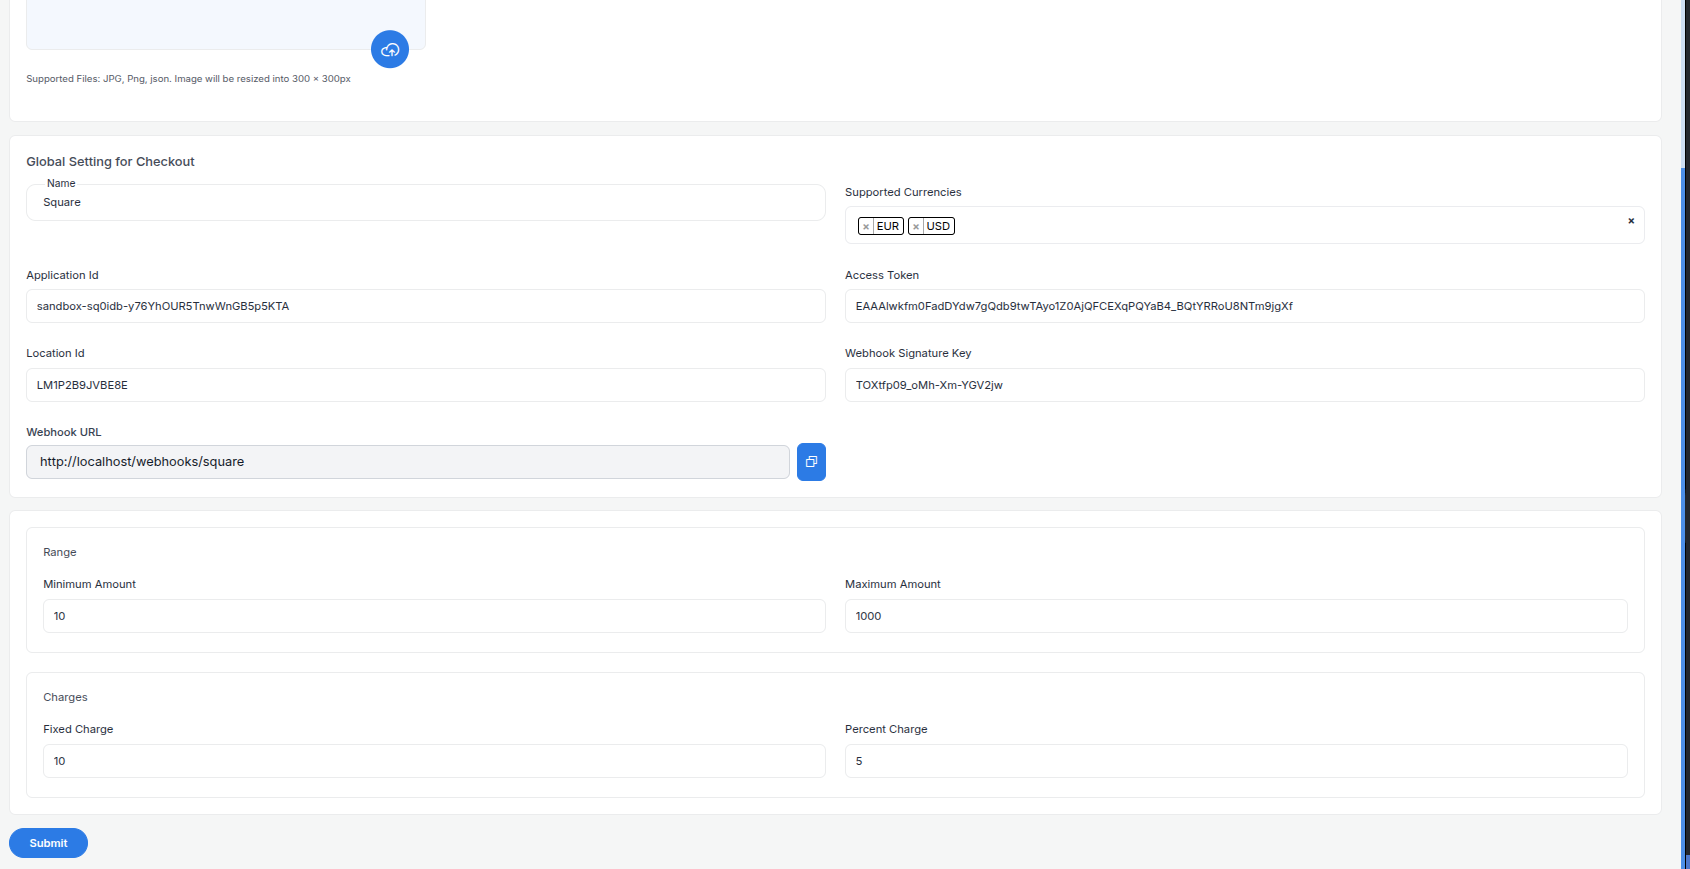
- Detailed Fields:
- Supported Currencies: Select currencies enabled on your Square account (e.g., USD, GBP, AUD). Each Location ID ties to one currency.
- Active: Toggle “On” to enable Square payments.
- Live Mode: Toggle “Off” for Sandbox, “On” for live transactions.
- Application ID: Enter your Application ID (e.g.,
sq0idp-abc123xyz). - Access Token: Enter your Sandbox or Live Access Token (e.g.,
sandbox-sq0atb-def456ghiorEAAAE_xyz789abc). - Location ID: Enter your Location ID (e.g.,
L1234567890). - Webhook URL: Copy this URL and paste it into the Square Developer Portal’s webhook settings.
- Minimum Amount: Set a floor (e.g., $1.00) per Square’s minimums.
- Maximum Amount: Set a ceiling (e.g., $10,000) based on your needs.
- Fixed Charge: Add a flat fee (e.g., $0.50) per transaction, if applicable.
- Percentage Charge: Add a percentage fee (e.g., 1%) on top of Square’s fees (2.9% + $0.30 online, 2.6% + $0.10 in-person).
- Click Submit to save. Your Square gateway is now configured.
Step 7: Test the Integration
Test your setup in Sandbox Mode:
- Enable Sandbox Mode:
- In your Admin Panel, ensure Live Mode is off and use Sandbox credentials.
- Access the Sandbox via developer.squareup.com.
- Simulate Payments:
- Use Square’s test cards:
- Success:
4111 1111 1111 1111, expiry12/25, CVV123. - Failure:
4000 0000 0000 0002, expiry12/25, CVV123. - Test ACH or digital wallets with Sandbox flows.
- Verify Webhooks:
- Check your server logs for webhook events (e.g.,
payment.updated). - Ensure payment statuses update in your Admin Panel (e.g., “Paid,” “Failed”).
- Debugging: If issues occur, check the Sandbox Dashboard’s Payments tab for error codes (e.g., “Card Declined”).
Step 8: Enable Live Mode
After successful testing:
- Square Dashboard:
- Ensure your account is verified and ready for live transactions.
- Log in to squareup.com/dashboard.
- Admin Panel:
- Go to System Settings > Payment Gateways > Square.
- Toggle Live Mode to “On”.
- Replace Sandbox credentials with live Application ID, Access Token, and Location ID.
- Save the changes.
- Webhook Confirmation: Verify the webhook URL is set in the live Developer Portal.
Step 9: Go Live
Launch your Square integration:
- Start Accepting Payments:
- Customers can now pay via enabled methods at checkout.
- Monitor initial transactions for issues.
- Live Verification:
- In the Dashboard, go to Payments to track transactions in real-time.
- Confirm deposits to your bank account (1-2 business days, or instant for 1% fee).
- Troubleshooting:
- If payments fail, review error logs in the Dashboard or contact support@squareup.com.
- Ensure your webhook endpoint remains active.
Additional Tips
- Square Fees: 2.9% + $0.30 for online/card-not-present, 2.6% + $0.10 for in-person (swiped/tapped). No monthly fees. See pricing.
- Documentation: Explore the Square Developer Docs for APIs like Web Payments SDK, Subscriptions, or Checkout API.
- Support: Contact support@squareup.com or use the Dashboard’s live chat for help.
Note:
If you need further assistance, our support team is available 24/7. Reach out at softivus@gmail.com or through the Admin Panel. Let’s get your Square payments up and running smoothly!