AamarPay Payment Gateway Integration
aamarPay is a leading online payment gateway and fintech solution provider in Bangladesh, launched in 2015 by Soft Tech Innovation Ltd. It supports over 20 payment methods, including Visa, MasterCard, bKash, Nagad, Rocket, and net banking, operating solely in Bangladeshi Taka (BDT). With features like Easy Checkout, QR payments, Instant Payment Notifications (IPN), a B2C Super App, and PCI DSS Level 1 compliance, aamarPay is ideal for e-commerce, offline retail, and social commerce businesses aiming to offer seamless, secure payment experiences in Bangladesh.
This guide walks you through integrating aamarPay into your application, from account creation to live deployment.
Step 1: Log in or Sign Up
- Visit aamarPay: Go to aamarPay and click Sign Up to create a merchant account or Log In if you have one.
- Account Creation: Provide your email, business name, phone number, and details (e.g., company type, website URL). Registration is online and streamlined.
- Email Verification: Check your inbox for a verification email and click the link to activate your account.
- Dashboard Access: Log in to the aamarPay Merchant Panel at merchant.aamarpay.com. Sandbox credentials are provided for testing.
Step 2: Set Up Your Account
Before processing payments, configure your aamarPay account:
- Complete Your Profile:
- In the Merchant Panel, go to Profile.
- Enter your business details: legal name, address, TIN (if applicable), and website URL (required for live transactions).
- Business Verification (Required for Live Mode):
- Navigate to Settings > Verification.
- Submit documents like a trade license, NID, and bank details (specific to Bangladesh). Email scans to support@aamarpay.com with company info (e.g., name, contact, domain).
- Verification takes 1-2 business days; you’ll be notified via email.
- Add a Settlement Bank:
- Go to Settings > Bank Details.
- Add your bank account (e.g., account number, bank name) for payouts. Settlements occur twice weekly (e.g., T+2, excluding holidays).
- Submit updates on company letterhead if changes are needed.
- Sandbox Mode: Use the Sandbox at sandbox.aamarpay.com with test credentials to simulate payments without verification.
Step 3: Obtain API Credentials
aamarPay provides credentials for integration:
- Store ID: Your unique merchant identifier (e.g.,
aamarpaytestfor Sandbox). - Signature Key: A secret key for signing requests (e.g.,
dbb74894e82415a2f7ff0ec3a97e4183for Sandbox). - Test vs. Live: Sandbox credentials are available instantly; live credentials require verification.
How to Get Your Credentials:
- Log in to the Merchant Panel.
- Go to Settings > API Credentials.
- Find:
- Store ID: Displayed for your store.
- Signature Key: Reveal or regenerate it here.
- Sandbox Credentials: Use defaults from developer.aamarpay.com (e.g., Store ID:
aamarpaytest, Signature Key:dbb74894e82415a2f7ff0ec3a97e4183). - Key Security: Keep the Signature Key confidential—use it server-side only. Add credentials to your application’s Admin Panel under System Settings > Payment Gateways > aamarPay.
Step 4: Configure Payment Methods
aamarPay supports 20+ payment methods, enabled via the Dashboard:
- Go to Settings > Payment Channels.
- Available methods include:
- Cards: Visa, MasterCard, UnionPay.
- Mobile Banking: bKash, Nagad, Rocket, Upay.
- Net Banking: Major Bangladeshi banks.
- Wallets: OK Wallet, Tap.
- Methods are enabled by default post-verification. Contact support@aamarpay.com for specific requests (e.g., EMI).
- These methods appear in your checkout flow once integrated.
Step 5: Set Up Webhooks
Webhooks (Instant Payment Notifications, IPNs) notify your server of payment events:
- In the Merchant Panel, go to Settings > IPN Settings.
- Add your IPN URL:
- Enter the URL from your application (e.g.,
https://yourwebsite.com/webhooks/aamarpay). - Find this URL in your Admin Panel under aamarPay settings.
- Ensure your endpoint accepts POST requests and returns a 200 OK response.
- Events: aamarPay sends events like:
status=success: Payment completed.status=failure: Payment failed.- Use
tran_idto track transactions.
- Save the IPN URL. Validate responses using the Signature Key.
- Testing: Test IPNs in Sandbox mode via sandbox.aamarpay.com.
Step 6: Set Up Credentials in Our Dashboard
Integrate aamarPay into your application:
- Log in to your application’s Admin Panel.
- Navigate to System Settings > Payment Gateways > aamarPay.
- Fill out the configuration form:
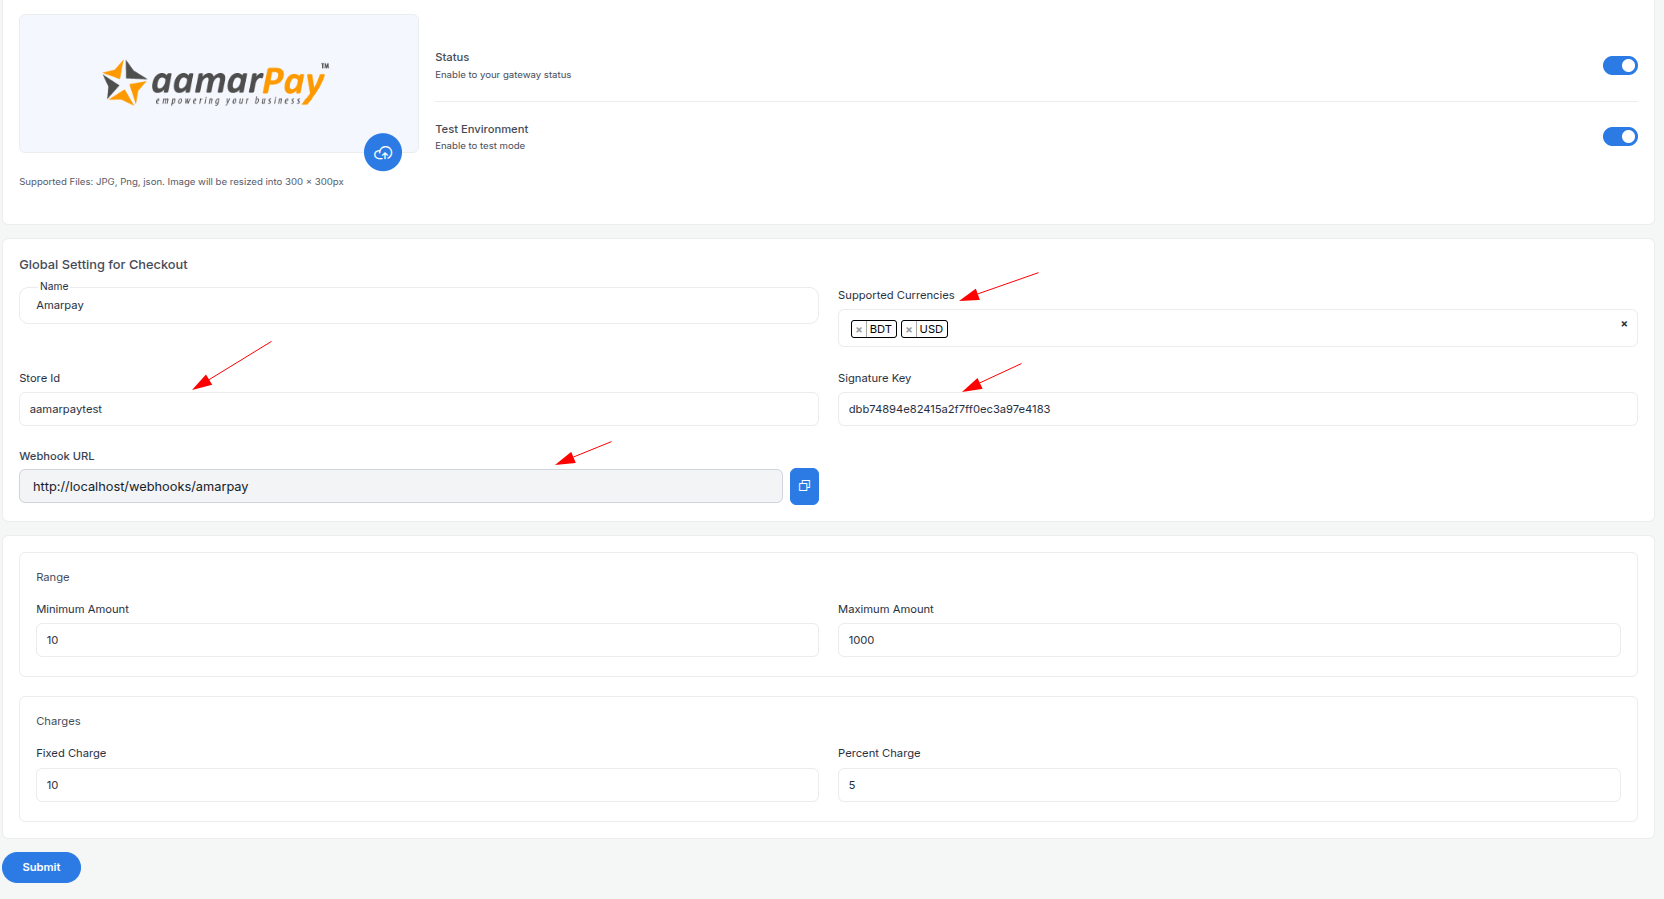
- Detailed Fields:
- Supported Currencies: aamarPay supports BDT only. Select “BDT”.
- Active: Toggle “On” to enable aamarPay payments.
- Live Mode: Toggle “Off” for Sandbox, “On” for live transactions.
- Store ID: Enter your Store ID (e.g.,
aamarpaytest). - Signature Key: Enter your Signature Key (e.g.,
dbb74894e82415a2f7ff0ec3a97e4183). - Webhook URL: Copy this URL and paste it into the Merchant Panel’s IPN settings.
- Minimum Amount: Set a floor (e.g., ৳10) per aamarPay rules.
- Maximum Amount: Set a ceiling (e.g., ৳1,00,000) based on your needs.
- Fixed Charge: Add a flat fee (e.g., ৳5) per transaction, if applicable.
- Percentage Charge: Add a percentage fee (e.g., 1%) on top of aamarPay’s fees (e.g., 2%).
- Click Submit to save. Your aamarPay gateway is now configured.
Step 7: Test the Integration
Test your setup in Sandbox Mode:
- Enable Sandbox Mode:
- In your Admin Panel, ensure Live Mode is off and use Sandbox credentials.
- Use the Sandbox endpoint:
https://sandbox.aamarpay.com/jsonpost.php.
- Simulate Payments:
- Use test cards from developer.aamarpay.com:
- Success:
4111 1111 1111 1111, expiry12/25, CVV123. - Failure: Contact support for failure scenarios.
- Test mobile payments (e.g., bKash) with Sandbox flows.
- Verify Webhooks:
- Check your server logs for IPN events (e.g.,
status=success). - Ensure payment statuses update in your Admin Panel (e.g., “Paid,” “Failed”).
- Debugging: Check the Merchant Panel’s Transactions tab or email support@aamarpay.com for error details.
Step 8: Enable Live Mode
After successful testing:
- aamarPay Dashboard:
- Ensure your account is verified and ready for live transactions.
- Log in to merchant.aamarpay.com.
- Admin Panel:
- Go to System Settings > Payment Gateways > aamarPay.
- Toggle Live Mode to “On”.
- Replace Sandbox credentials with live Store ID and Signature Key.
- Update the endpoint to
https://secure.aamarpay.com/jsonpost.php. - Save the changes.
- Webhook Confirmation: Verify the IPN URL is set in the live Merchant Panel.
Step 9: Go Live
Launch your aamarPay integration:
- Start Accepting Payments:
- Customers can now pay via enabled methods at checkout.
- Monitor initial transactions for issues.
- Live Verification:
- In the Merchant Panel, go to Transactions to track payments in real-time.
- Confirm settlements to your bank account (twice weekly, e.g., T+2).
- Troubleshooting:
- If payments fail, review logs in the Merchant Panel or contact support@aamarpay.com.
- Ensure your webhook endpoint remains active.
Additional Tips
- aamarPay Fees: Approximately 2% per transaction (varies by method); no monthly fees but a one-time signup fee applies. Contact support@aamarpay.com for exact rates.
- Documentation: Explore the aamarPay Developer Docs for APIs like JSON POST, QR payments, or plugins (e.g., WooCommerce).
- Support: Reach out via support@aamarpay.com, phone (16/7), or the Merchant App.
Note:
If you need further assistance, our support team is available 24/7. Contact us at softivus@gmail.com or through the Admin Panel. Let’s streamline your payments with aamarPay!