Mollie Payment Gateway Integration
Mollie is a Netherlands-based payment service provider designed to simplify online payments for businesses. It supports a wide array of payment methods, including credit/debit cards (Visa, MasterCard), digital wallets (PayPal, Apple Pay), and local European options like iDEAL, Bancontact, and SEPA Direct Debit. Mollie is known for its developer-friendly API, transparent pricing, and support for multiple currencies, making it an excellent choice for businesses targeting European markets and beyond.
This guide walks you through integrating Mollie into your application, from account setup to live transactions.
Step 1: Log in or Sign Up
- Visit Mollie: Go to the Mollie website and click Sign Up to create an account or Log In if you already have one.
- Account Creation: Provide your email, password, and basic business details (e.g., company name, country). Mollie supports both individual and business accounts.
- Email Verification: Check your inbox for a verification email from Mollie and click the link to activate your account.
- Dashboard Access: After verification, log in to be redirected to the Mollie Dashboard, your central hub for managing payments and settings.
Step 2: Set Up Your Account
Mollie requires some initial configuration before you can process payments:
- Complete Your Profile:
- In the Mollie Dashboard, go to Settings > Organisation.
- Fill in your business details: legal name, address, VAT number (if applicable), and website URL.
- For individuals, provide personal details like name and address.
- Business Verification:
- Mollie requires identity and bank account verification to comply with financial regulations.
- Upload documents such as a government-issued ID, proof of address, and bank statements (specific requirements depend on your country).
- This process may take 1-2 business days. You’ll receive an email once approved.
- Add a Bank Account:
- Navigate to Settings > Bank Accounts.
- Enter your IBAN (for SEPA countries) or other bank details for payouts.
- Verify the account with a small test deposit (if prompted).
- Approval Status:
- Until verified, you can use Test Mode. Live payments unlock after approval.
Step 3: Obtain API Credentials
Mollie uses API keys to authenticate your application. You’ll get two types:
- Test API Key: For sandbox testing (starts with
test_). - Live API Key: For real transactions (starts with
live_).
How to Get Your Credentials:
- In the Mollie Dashboard, go to Developers > API Keys.
- You’ll see two sections:
- Test API Key: Copy this for development and testing.
- Live API Key: Available after verification; copy this for production.
- Key Security: Treat these keys like passwords. Never expose them in client-side code (e.g., JavaScript). The Test API Key is safe for sandbox use, but the Live API Key must stay server-side.
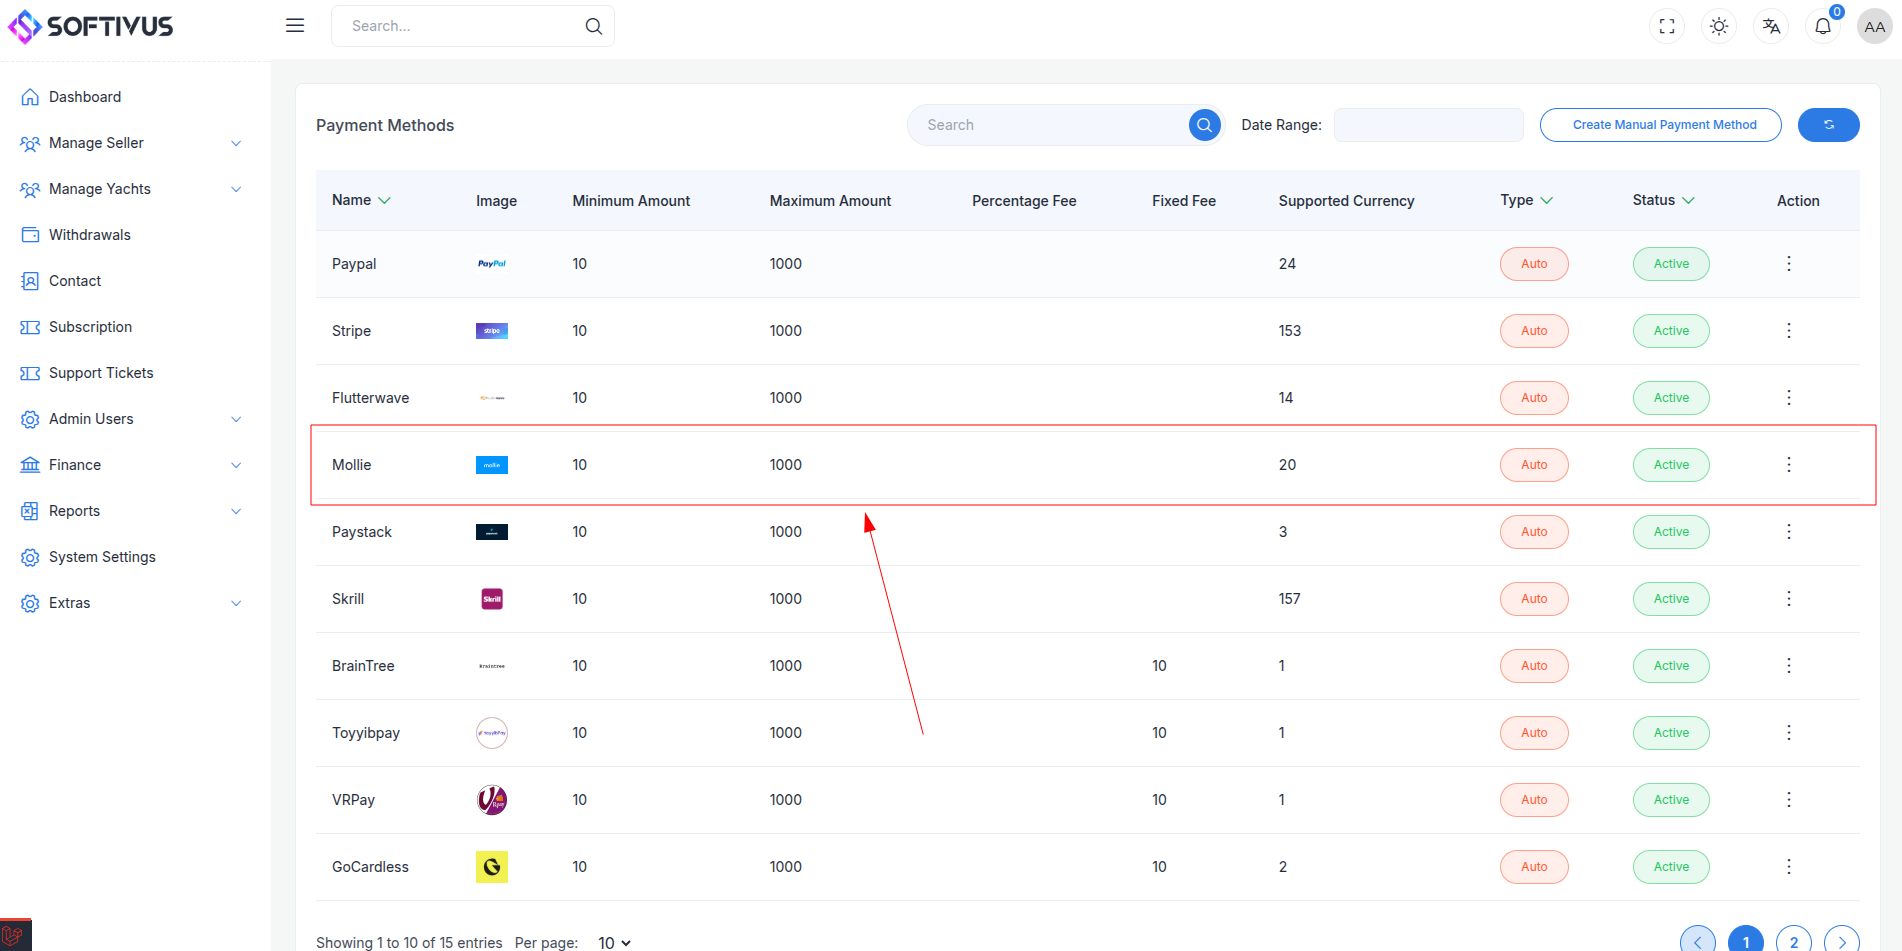
- Store these keys securely and add them to your application’s Admin Panel under System Settings > Payment Gateways > Mollie.
Step 4: Configure Payment Methods
Mollie supports numerous payment methods, which you must enable manually:
- Go to Settings > Payment Methods in the Mollie Dashboard.
- Browse the list (e.g., Credit Card, PayPal, iDEAL, SEPA Direct Debit).
- Click Enable next to each method you want to offer:
- Some methods (like iDEAL) require a Dutch bank account or specific setup.
- Credit cards and PayPal are universally available.
- Activation Time: Most methods activate instantly, but some (e.g., SEPA) may require Mollie’s approval.
- Once enabled, these methods will appear in your checkout flow after integration.
Step 5: Set Up Webhooks
Webhooks allow Mollie to notify your server about payment events (e.g., successful payments, refunds).
- In the Mollie Dashboard, go to Developers > Webhooks.
- Click Add Webhook.
- Webhook URL:
- Enter the URL provided by your application (e.g.,
https://yourwebsite.com/webhooks/mollie). - Find this URL in your Admin Panel under the Mollie gateway settings.
- Ensure this endpoint is publicly accessible and can handle POST requests.
- Event Selection: Mollie automatically sends notifications for key events like:
payment.paid: Payment completed successfully.payment.failed: Payment attempt failed.payment.refunded: Payment was refunded.- You don’t need to select events manually; Mollie sends all relevant updates.
- Click Save.
- Testing Webhooks: Mollie provides a test feature—click Test Webhook to simulate a notification and verify your server’s response.
Step 6: Set Up Credentials in Our Dashboard
Integrate Mollie into your application:
- Log in to your application’s Admin Panel.
- Navigate to System Settings > Payment Gateways > Mollie.
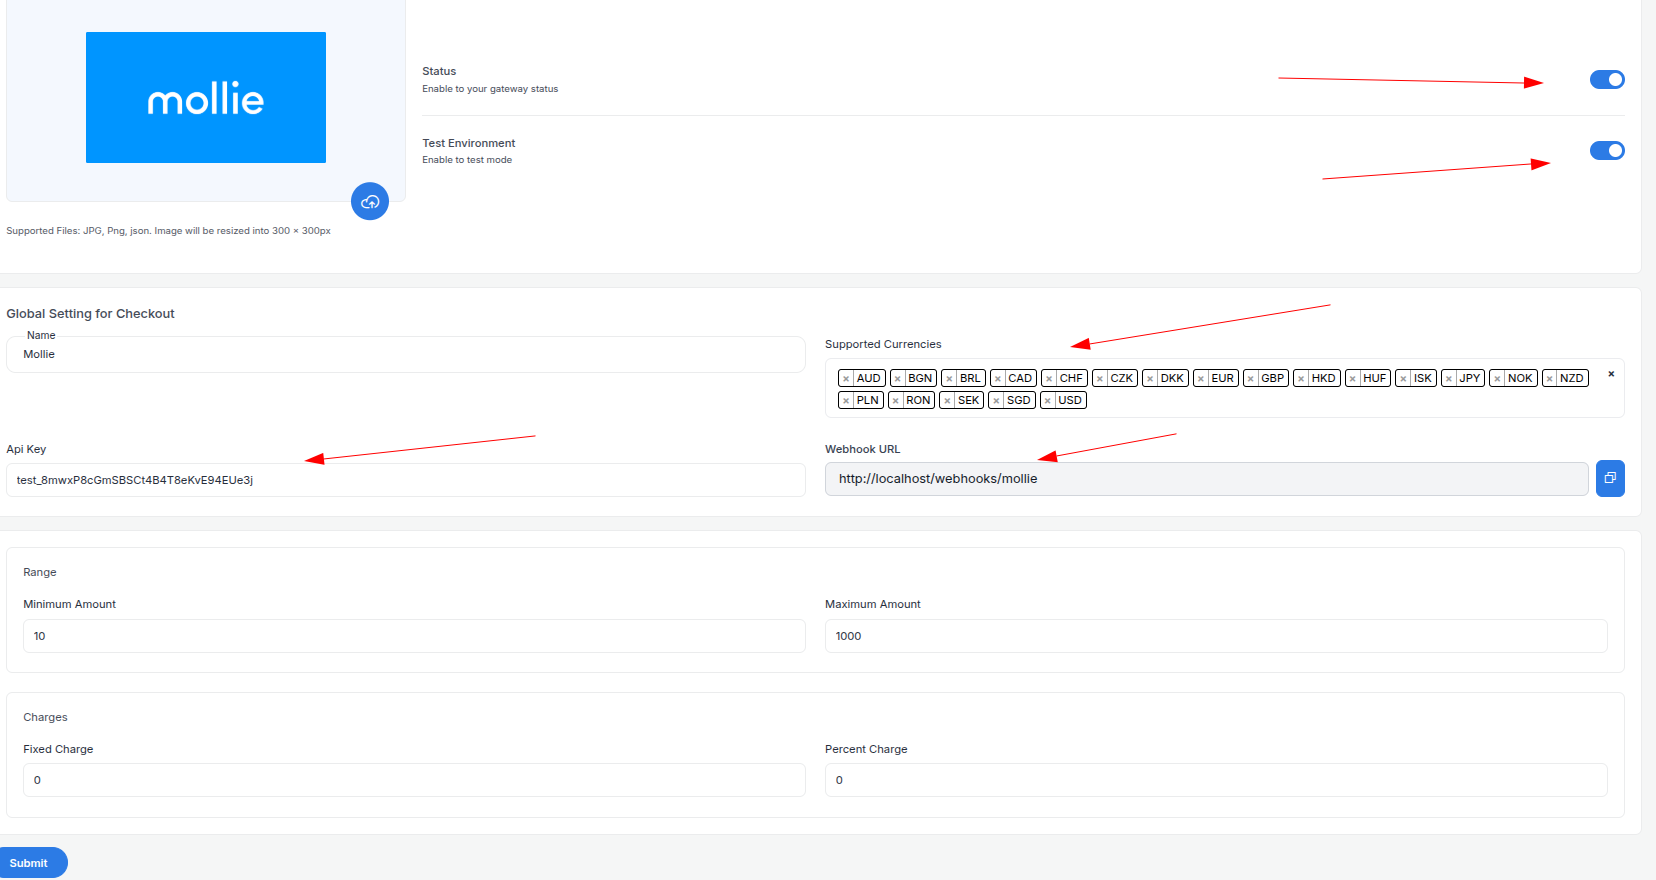
- Fill out the configuration form:
- Detailed Fields:
- Supported Currencies: Choose currencies (e.g., EUR, USD, GBP) based on your Mollie account settings and target markets.
- Active: Toggle to “On” to enable Mollie payments.
- Live Mode: Toggle “Off” for testing, “On” for live transactions.
- Test API Key: Paste your Mollie Test API Key (e.g.,
test_abc123). - Live API Key: Paste your Mollie Live API Key (e.g.,
live_xyz789). - Webhook URL: Copy this URL (e.g.,
https://yourwebsite.com/webhooks/mollie) and paste it into the Mollie Dashboard’s webhook settings. - Minimum Amount: Set a floor (e.g., €1.00) to prevent micro-transactions.
- Maximum Amount: Set a ceiling (e.g., €10,000) based on your business needs.
- Fixed Charge: Add a flat fee per transaction (e.g., €0.50), if applicable.
- Percentage Charge: Add a percentage fee (e.g., 2.5%) on top of Mollie’s fees.
- Click Submit to save. Your Mollie gateway is now configured.
Step 7: Test the Integration
Test your setup before going live:
- Enable Test Mode:
- In your Admin Panel, ensure Live Mode is off and the Test API Key is used.
- In the Mollie Dashboard, confirm you’re working with the Test API Key.
- Simulate Payments:
- Use Mollie’s test payment details:
- Credit Card:
5404 0000 0000 0001, expiry12/25, CVC123. - iDEAL: Select “Test Bank” during checkout.
- Test scenarios: successful payments, declines, and refunds.
- Verify Webhooks:
- Check your server logs to ensure webhook notifications arrive.
- Confirm payment statuses update in your Admin Panel (e.g., “Paid,” “Failed”).
- Debugging: If payments fail, check the Mollie Dashboard’s Transactions section for error codes (e.g., “Insufficient Funds”).
Step 8: Enable Live Mode
After successful testing:
- Mollie Dashboard:
- Ensure your account is verified and you have the Live API Key.
- Admin Panel:
- Go to System Settings > Payment Gateways > Mollie.
- Toggle Live Mode to “On”.
- Replace the Test API Key with the Live API Key.
- Save the changes.
- Webhook Confirmation: Verify the webhook URL is still correctly set in the Mollie Dashboard.
Step 9: Go Live
Launch your Mollie integration:
- Start Accepting Payments:
- Customers can now use enabled payment methods at checkout.
- Monitor the first few transactions closely for issues.
- Live Verification:
- In the Mollie Dashboard, go to Transactions to see real-time payment data.
- Confirm funds are deposited to your bank account (payouts occur daily or weekly, depending on settings).
- Troubleshooting:
- If payments fail, check Mollie’s error logs or contact support.
- Ensure your webhook endpoint remains active.
Additional Tips
- Mollie Fees: Mollie charges per transaction (e.g., €0.25 + 2.8% for cards). Review pricing at mollie.com/pricing and factor this into your charges.
- Documentation: Refer to the Mollie API Docs for advanced features like recurring payments or custom checkouts.
- Support: Email info@mollie.com or use the Dashboard’s live chat for help.
Note:
If you need further assistance, our support team is available 24/7. Contact us via softivus@gmail.com or through the Admin Panel’s help section. Happy integrating!